How-to
View the project timeline
The timeline shows the project's epics over time, with their work items, their progress and the sprints, like Jira's Timeline.
Open the timeline
Link to the “Open the timeline” sectionIn your project, click Timeline in the sidebar. The timeline opens at the month scale, on the period around today.
Read a row
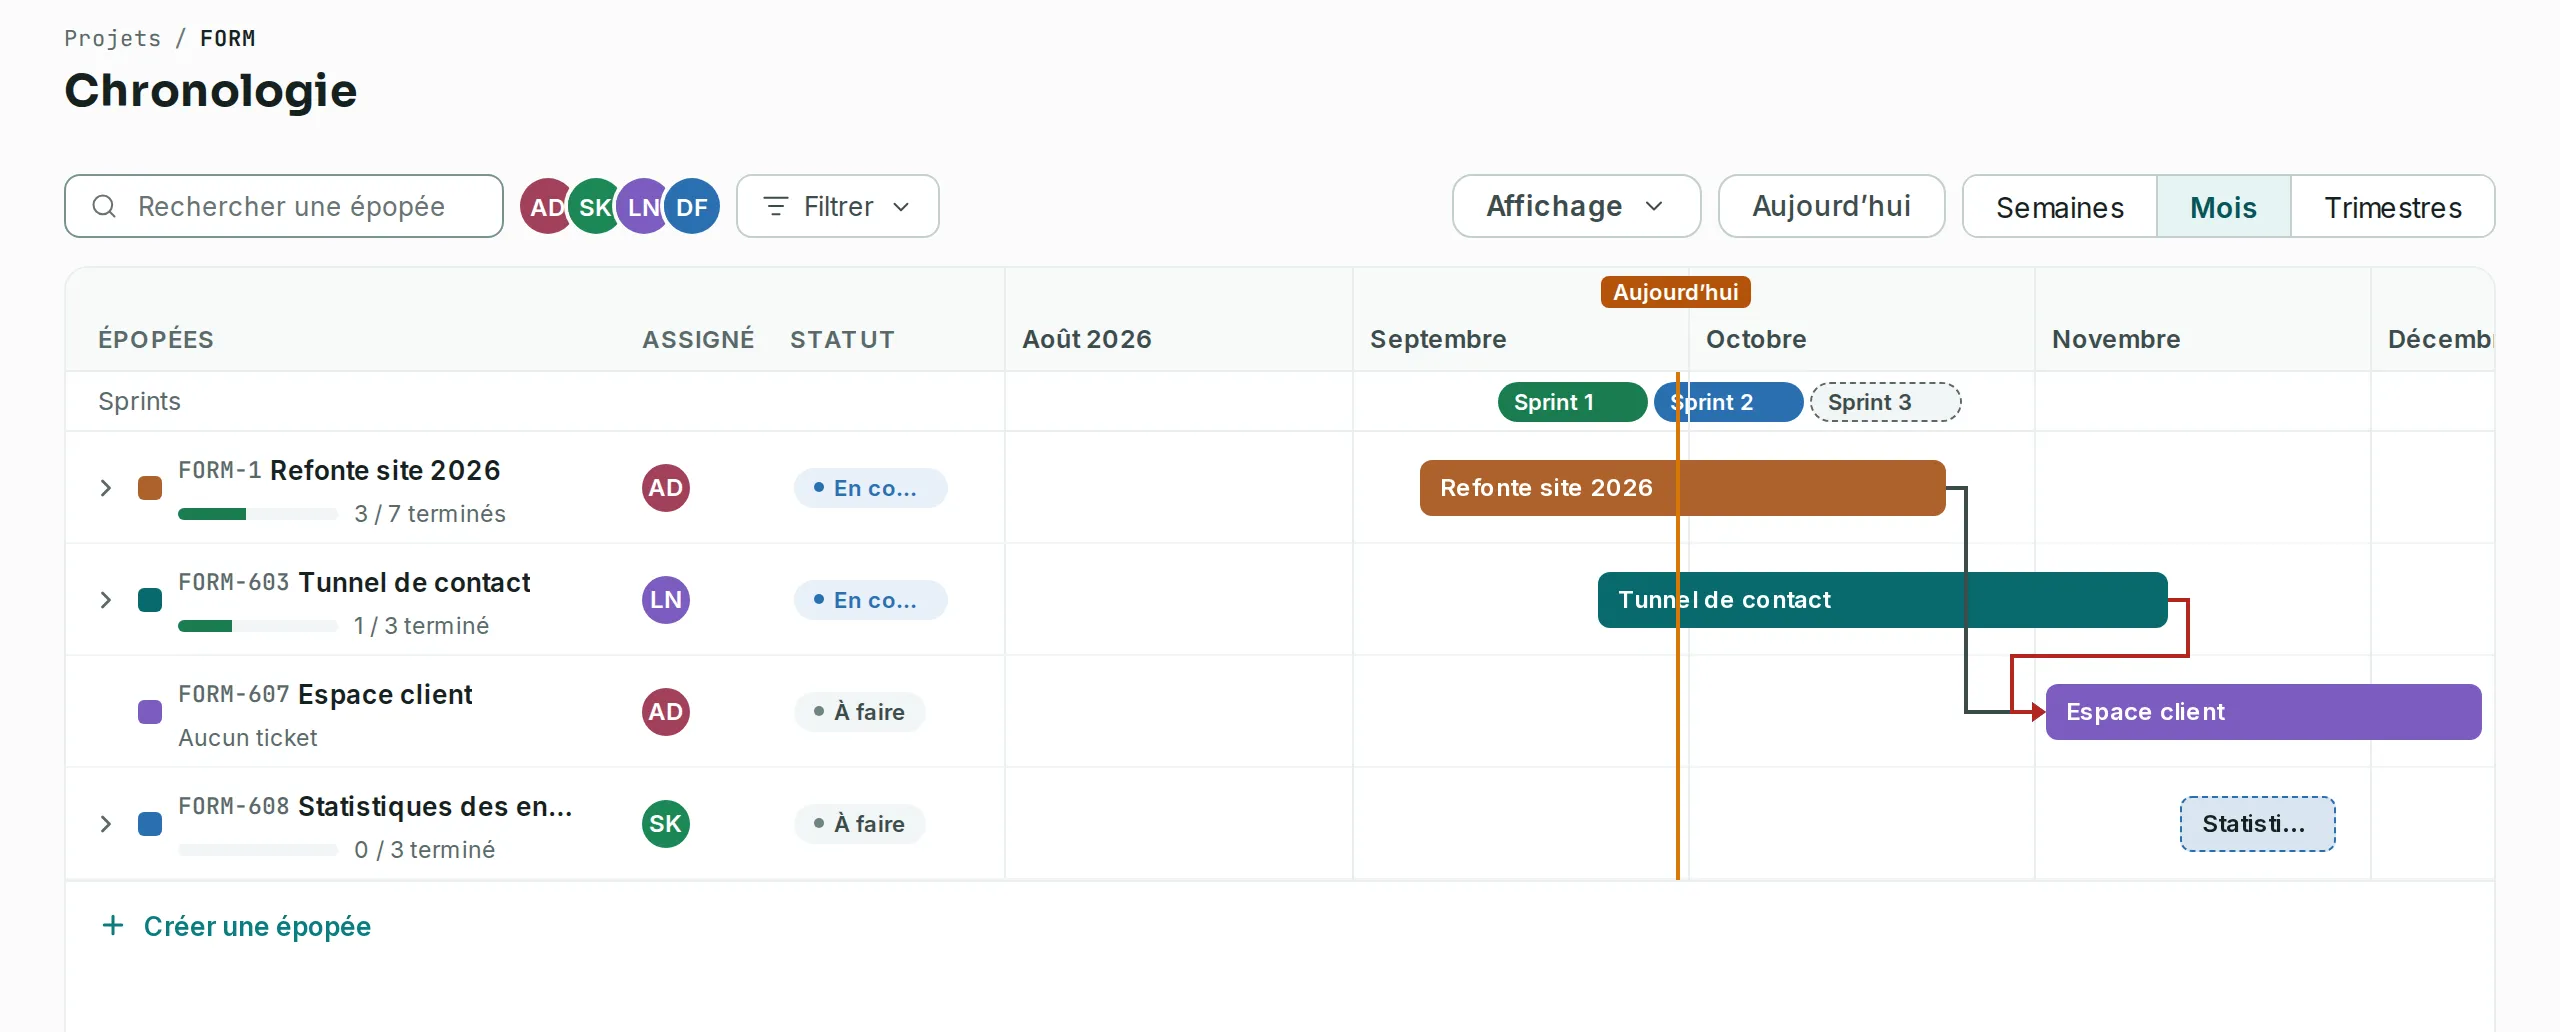
Link to the “Read a row” sectionEach epic takes a row, with its key, its name and its progress: a gauge and a count, for example “3 / 7 done”. Then come the assignee (or Unassigned) and the status. Hovering the avatar shows the person’s card, with their name, email address and role in the project; with the keyboard, it opens when the cell gets focus.
Click the arrow at the start of the row to expand the epic: its work items appear below it, stories, tasks and bugs. Subtasks count in the progress, but have no row. An epic without work items says “No work items” and does not expand.
Epics come in the order of their start, or failing that of their due date, then those without dates. They open collapsed.
Read a bar
Link to the “Read a bar” sectionA bar runs from the work item’s Start date to its Due date, due date included. Without a start date, it sits on its due date. Without a due date, the row shows No dates instead of a bar.
An epic’s bar carries its name, in the epic’s colour, the same as on the board. The bars of its work items take that colour, lighter.
An epic without dates takes its work items’ dates, from the first start to the last due date: its bar is then pale with a dotted outline. If none of its work items has a start date, the bar fades out on that side, and the Schedule cell gives only the end, for example “Until December 5, 2026”. A date set on the epic wins, even alone: an epic with only a start date then shows No dates.
At the top, the Sprints band shows the project’s sprints with their state. The line labelled Today marks the day.
See dependencies
Link to the “See dependencies” sectionWhen a work item blocks another (the blocks link of Link tickets), a line leaves the end of its bar and reaches the start of the blocked work item’s bar. The line turns red when the blocked work item starts before the other one ends, or on the same day.
Hover a line, or put the focus on one of its two rows, to read for example “FORM-1 blocks FORM-607”. A line is only drawn between two rows that are shown and dated: expand an epic to see its work items’ lines. The Schedule cell also says, in words, what a row blocks and what blocks it, and whether their dates are in conflict, even when the lines are hidden.
Only the blocks links between two work items of the project are drawn. They are set and removed from the work item.
Change dates
Link to the “Change dates” sectionOn a computer or a tablet, drag a bar: both its dates shift together. Pull one of its edges to change the Start date or the Due date. Dragging the pale bar of an epic gives it its own dates: it then stops following its work items.
On a No dates row, a click sets 7 days in Weeks, 14 in Months, 30 in Quarters, from the day clicked. With the keyboard, Space sets them from today.
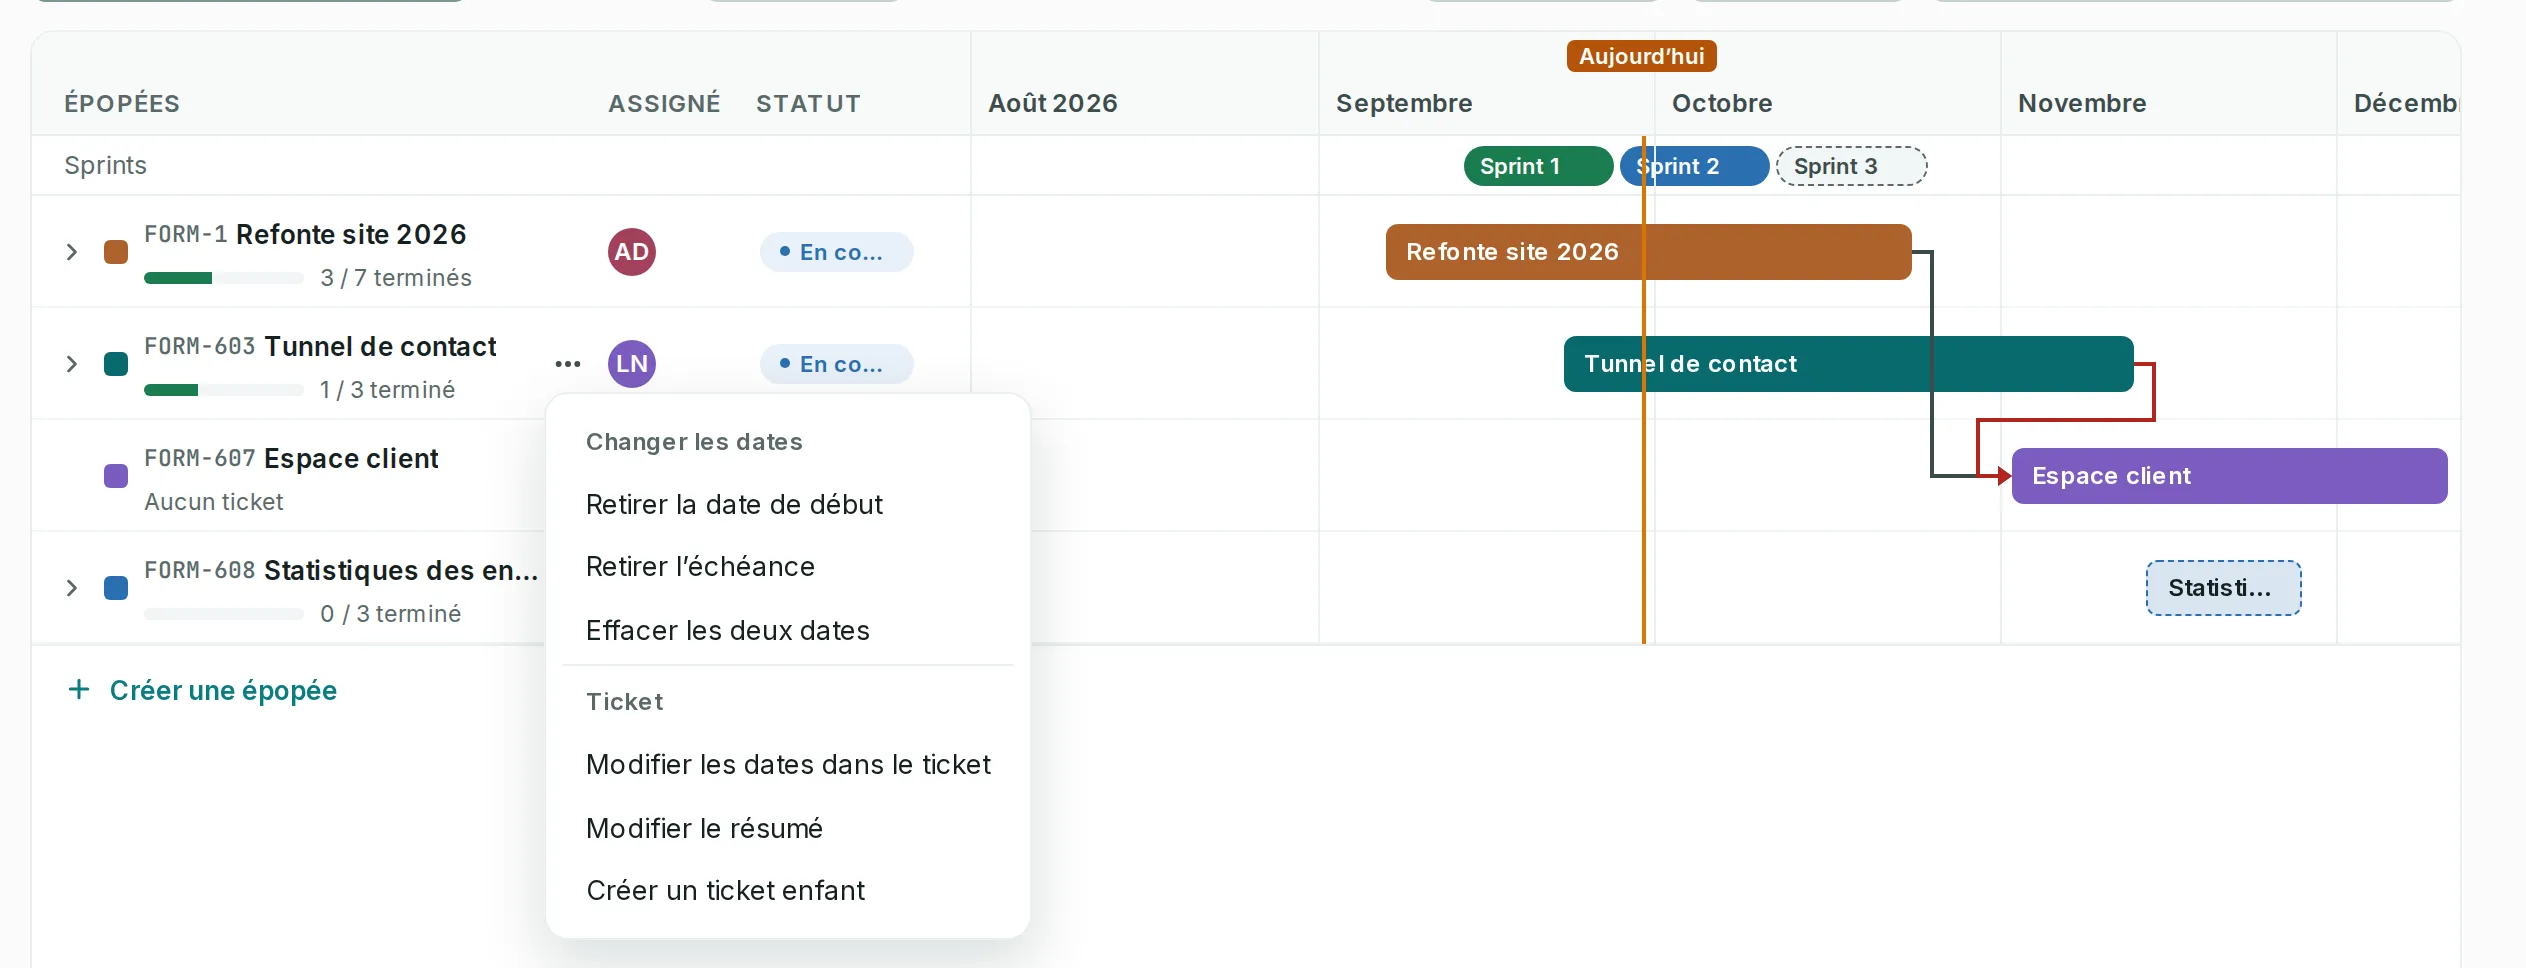
The row’s “…” menu, or a right click on its schedule, opens Change dates: Remove start date, Remove due date or Clear both dates. Under Work item, Edit dates in the work item opens the work item in the panel. On an epic, Create a child work item is added there.
With the keyboard, on the schedule cell, Space grabs the bar, the left and right arrows shift it by a day, Shift and these arrows move the due date, Enter confirms and Escape cancels; Shift+F10 opens the menu. On a tablet, press and hold the bar before dragging it. On a phone, the timeline is read without changing anything.
After each change, Undo puts the previous dates back. If the work item changed in the meantime, nothing is saved, the timeline says so and reloads.
A Member without the right to edit other people’s work items only changes the dates of the work items they reported or are assigned.
Change the scale
Link to the “Change the scale” sectionThe Weeks, Months and Quarters buttons change the timeline’s scale. Today brings the timeline back to today. The scale stays in the page address: a shared link opens at the same scale.
The timeline scrolls sideways in its frame, and the epics column stays in place.
Search for an epic
Link to the “Search for an epic” sectionType a key or a word of the name in Search epics: only the matching epics stay, with their work items. Clear the search to see them all again.
When Work items under their epic is off, the box becomes Search work items and searches every work item of the list.
Filter the timeline
Link to the “Filter the timeline” sectionClick Filter, choose a field, then tick values: Assignee (including Unassigned), Status, Work type or Labels. An epic stays as long as it matches, or one of its work items matches. Below it, only those work items stay. Filters only hide: the progress always counts all the epic’s work items.
The Subtask type is offered only when Work items under their epic is off: that is the only case where a subtask has its row.
The avatars of the bar filter a person in one click; past six, “+N” opens the list of the others. Filters stay in the page address: a shared link keeps them. When no row is left, click Clear filters (or Clear search and filters when a search is on).
View settings
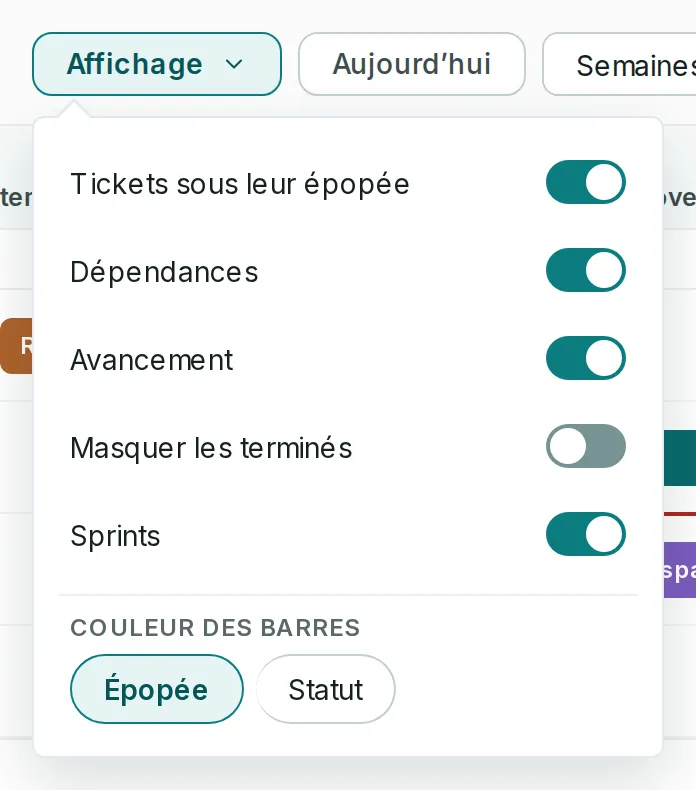
Link to the “View settings” sectionClick View:
| Setting | What it does |
|---|---|
| Work items under their epic | On, each epic expands to its work items. Off, all the project’s work items form a single list, subtasks included. |
| Dependencies | Shows or hides the lines between a work item and those it blocks. |
| Progress | Shows or hides the gauge under each epic. |
| Hide done items | Hides the done epics. The done work items of an open epic stay. |
| Sprints | Shows or hides the sprints band. |
| Bar color | Epic: the epic’s colour. Status: grey for To do, blue for In progress, green for Done. |
These settings stay in this browser. A phone keeps the default view.
Open a sprint’s card
Link to the “Open a sprint’s card” section- In the Sprints strip at the top of the timeline, click a sprint.
- Its card opens: its state, its name, its Start date and its Planned end.
- The card’s More actions button offers See in the backlog, and Edit sprint for the Admin or whoever manages sprints, on a sprint that is not closed.
After an edit, the sprint shows its new name and dates in the strip straight away. With the keyboard, the list of sprints a screen reader reads opens the same card.
Edit a work item’s summary or epic
Link to the “Edit a work item’s summary or epic” section- Hover over the row: a pencil appears at the end of the title. Click it, fix the summary, then press Enter. Esc cancels.
- The row’s “…” menu also offers, under Work item, Edit the summary, and the Epic group: the project’s epics, and Remove the epic. With the keyboard, Shift + F10 opens this menu.
A work item that changes epic moves under its new row, and a message says so. A work item without an epic leaves the timeline, which only shows epics and their work items; with Work items under their epic off, it keeps its row.
Create an epic
Link to the “Create an epic” sectionClick Create epic, below the last row. The creation window opens with the Epic type already chosen. Once the epic is created, it shows on the timeline and the focus comes back to the button. This button only shows if you can create work items in the project.
Create a child work item
Link to the “Create a child work item” sectionAs in Jira, hover an epic’s row and click the “+” that shows at the end of the row. On a tablet, it stays shown: tap it. The creation window opens as a Story, with the epic already chosen in Parent epic. You can change the type or the epic before creating. The work item sits under the chosen epic: expand it to see it. The focus then comes back to the “+”.
With the keyboard, on the epic’s row, Shift+F10 opens its menu: Create a child work item opens the same window, and the focus then comes back to the row. It stays there even if you cannot change this epic’s dates.
The “+” only shows if you can create work items in the project. On a phone, use the Create button of the top bar.
See a work item
Link to the “See a work item” sectionClick the key or the name of a row. The work item opens in the side panel, over the timeline, as on the board. What you change there shows on the timeline as soon as the change is saved.
Move through the timeline with the keyboard
Link to the “Move through the timeline with the keyboard” sectionThe Tab key enters the timeline on a single row: the one you left, otherwise the first. Then:
| Key | What it does |
|---|---|
| Up and down arrows | The previous or next row. |
| Right arrow | Expands a collapsed epic. Otherwise, moves into the row’s cells: epic, assignee, status, schedule. |
| Left arrow | Collapses the epic, or goes up from a work item to its epic. In the cells: the previous cell, then the row. |
| Home, End | The first or last row. In the cells: the first or last cell of the row. |
| Page Up, Page Down | Several rows up or down. |
| Enter | Opens the row’s work item in the panel. |
A screen reader announces each epic with its progress, and the Schedule cell says the dates.
On a phone
Link to the “On a phone” sectionThe timeline shows the month scale. A banner gives the running sprint and its end date. Each epic becomes a card, with its schedule, its bar across the months and its progress. Tap a card’s arrow to see its work items and their dates. Tap a work item to open it. Dependencies do not show there.
On a tablet, the Assignee and Status columns make room for the timeline.
If something blocks you
Link to the “If something blocks you” section| What you see | What to do |
|---|---|
| “No epics in this project”. | Create an epic with Create epic, or with the Create button of the top bar, choosing the Epic type. Then link work items to it. |
| A work item does not appear. | It is linked to no epic, or it is a subtask: it counts in its epic’s progress without a row. |
| “No row matches the filters or the view settings”. | Click Clear filters, or reopen View to turn a setting back on. |
| A row shows No dates. | The work item has no due date. Click the row to add dates, or open the work item, as Date a work item explains. |
| A bar does not start on the right day. | Its Start date is missing or wrong. Pull the bar’s left edge, or open the work item to fix it. |
| The timeline says it shows only the project’s first work items. | The project has more than 4,000 work items, and the next ones are not shown. The Epics screen lists them all, with their progress. |
Good to know
Link to the “Good to know” section- Dependencies are read on the timeline, but set from the work item.
- On a wide screen, the search and the filters stay in the page address. A phone does not show them.